In my previous posts, I have experimented with different techniques to generate random dinosaur names, including Markov Chain. However, I always had a desire to run a neural network on the Raspberry Pi Pico. While I was familiar with CircuitPython, I had little experience with the C/C++ SDK for Pi Pico. To make the process easier, I created a small tool that made building code for Pi Pico using C/C++ SDK easy. Next, I spent time creating a lightweight model in Keras and TensorFlow, and then ported this model to C/C++. Finally, I compiled a program that runs on Pi Pico. In this article, I share my experiences and provide links to the code, so you can try out your own experiments with Pi Pico.
Here is the link to project’s Github repo: https://github.com/code2k13/pipico_build_setup/tree/main/dino_names_example
Overview of approach
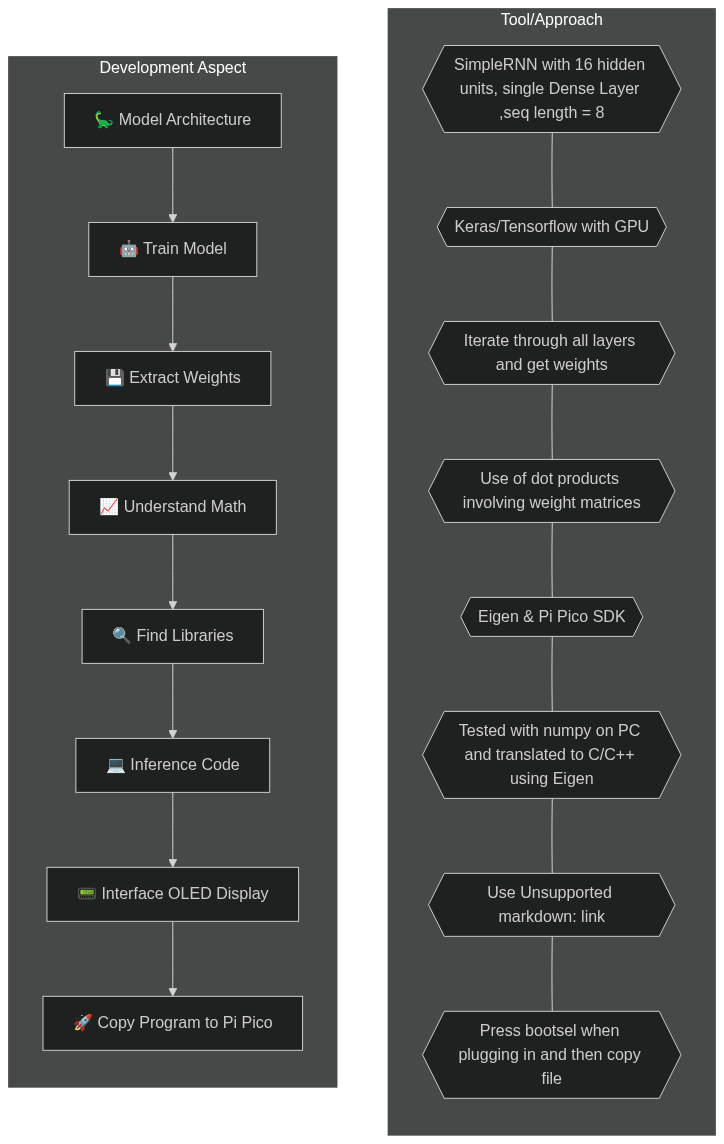
Selecting the right model
The model that we have selected is a very basic one, consisting of just two layers: a SimpleRNN layer and a Dense layer. It has a total of 747 trainable parameters. While this model may be too small for some tasks, it is simple enough and small enough to be run on a microcontroller like the Raspberry Pi Pico. This is how our model looks like: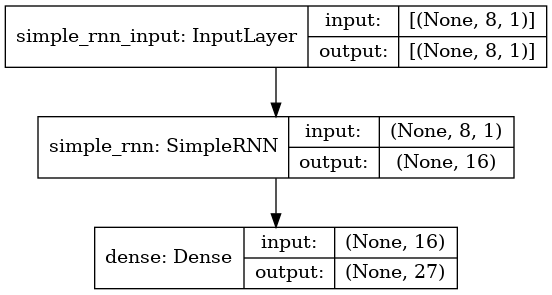
Training our Model
In order to train our neural network model, we will be using Keras running on an actual machine, preferably with a GPU. To this end, we have created a Kaggle notebook which can be used to train the model. You can access the notebook by clicking on this link: https://www.kaggle.com/code/finalepoch/rnn-based-dinosaur-name-generation-on-raspi-pico
Once we have trained the model using Keras, we will extract the weights and port them over to C/C++ code to run on the Pi Pico. By doing so, we will be able to generate random dinosaur names on the Pi Pico without the need for a full-blown computer or internet connection.
Extracting Weights
A model is described using two things: its structure and its weights. Even though we trained the model using Keras, at the end of the day, it is just a bunch of matrices. Performing inference is mostly about doing some operations involving an input matrix and the weight matrices. Before we go down that path, we have to find a way to extract weights. With Keras, extracting weights is pretty straightforward.
W_x = model.get_weights()[0] # Shape is 1x16, |
Understanding the Math
Comprehending the math involved in performing the inference can be somewhat complicated, and you have the option to skip this part if you prefer. Initially, we will write the code in Python using only numpy, without Keras or Tensorflow, to perform the inference. Once we confirm that our code is functional, we will then replicate this code in C/C++ to allow the model to work on our Pi Pico. Although ‘numpy’ is not available on Pi Pico, understanding and implementing the necessary operations by hand makes it easier to execute them in C/C++
Here is the algorithm for the code:
Extract the weights from the trained model.
Initialize the hidden state to zero.
Loop over the input sequence x_input:
- Get the i-th input element from the sequence.
- Reshape the input element to a 1x1 matrix.
- Compute the hidden state using the input element, the current hidden state, and the weights of the model.
- Update the current hidden state with the computed hidden state.
Compute the output(next charactor of dino name) by multiplying the current hidden state with the dense weights and adding the dense bias.
Compute the softmax of the output to get a probability distribution over the possible characters.
Sample the next character from the probability distribution using the random.choices() function.
Return the sampled character as the predicted next character in the sequence.
Note that the algorithm assumes that the input sequence has a fixed length of 8. If the input sequence has a different length, the loop in step 4 needs to be modified accordingly. Here is the Python implementation using numpy
W_x = model.get_weights()[0] |
Finding required libraries (in C/C++ for Pi Pico)
The process of implementing the code in Python using numpy was comparatively straightforward. However, it is imperative to note that this code will not function on Pi/Pico. As a result, we must identify a suitable alternative to numpy that is compact enough to operate on Pi Pico. Fortunately, the Eigen library is a high-quality header-only library that is straightforward to configure and compile with the C/C++ SDK for Pi Pico. It offers built-in support for all matrix operations, such as dot products and tanh calculations. Additionally, calculating softmax is also simple with this library. Nonetheless, it is essential to keep in mind that it does not support random sampling using a list of probabilities (like Python’s random.choices) function. Therefore, we must create our own C/C++ implementation of this functionality.
Inference Code (in C/C++)
char randomSelect(const MatrixXd probabilities, const char *chars, |
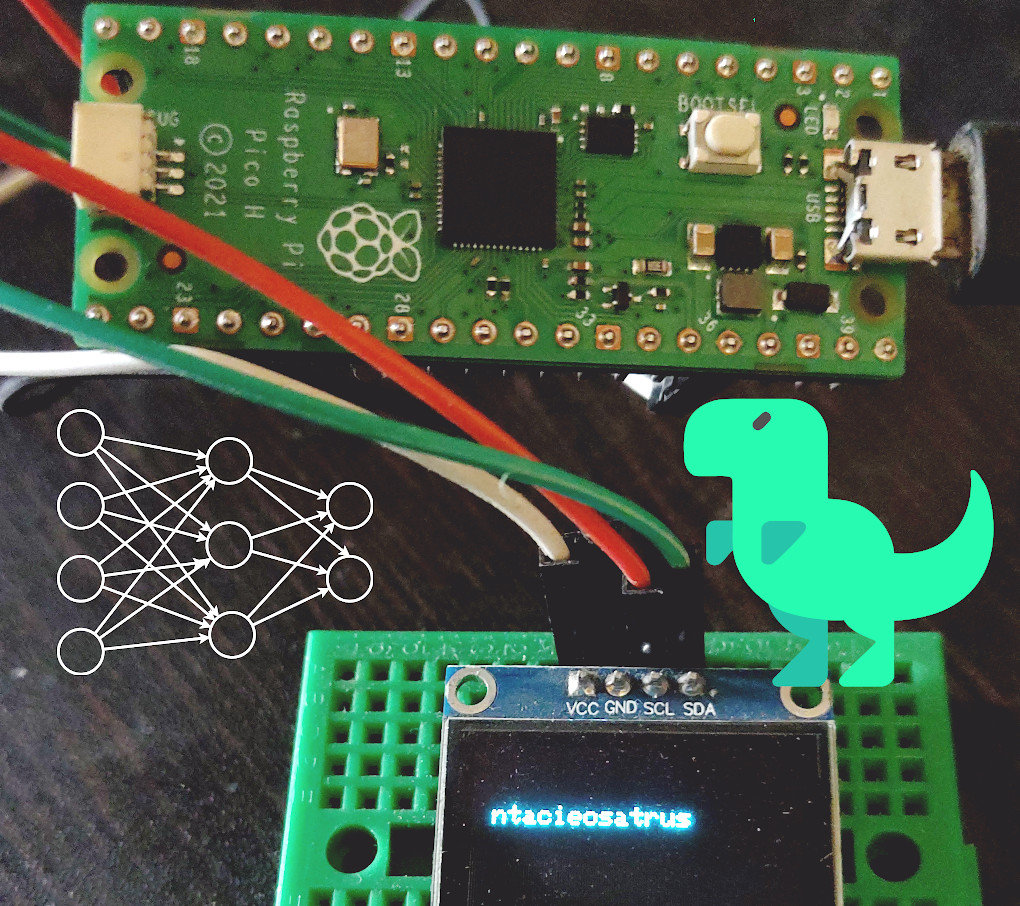
Interfacing OLED Display to Pi Pico
We will use the pico-ssd1306 library from David Schramm to control the OLED display from our code.
The table below gives connections that are to be made for connecting the display.
| Display PIN | Pi Pico Pin |
|---|---|
| VCC | VCC |
| GND | GND |
| SCL | GP3 |
| SDA | GP2 |
Compiling and copying the code to Pi Pico
I will highly recommend using my docker based build setup for compiling the code. The full code with sample weights and compiling instructions can be found here : https://github.com/code2k13/pipico_build_setup/blob/main/README.md
After building the OLED example, you can locate the resulting dino_names_example.uf2 file in the dino_names_example/build/ directory on your machine. This file can also be found inside the docker container at app/build/dino_names_example.uf2.
Once you have this file, connect your Pi Pico board to your computer by holding down the ‘bootsel’ button and releasing it once the board is connected. Then, all you need to do is copy the dino_names_example.uf2 file to your Pi Pico. You should start seeing randomly generated dinosaur names !
With every passing second, discover a new dinosaur and enjoy the thrill!


