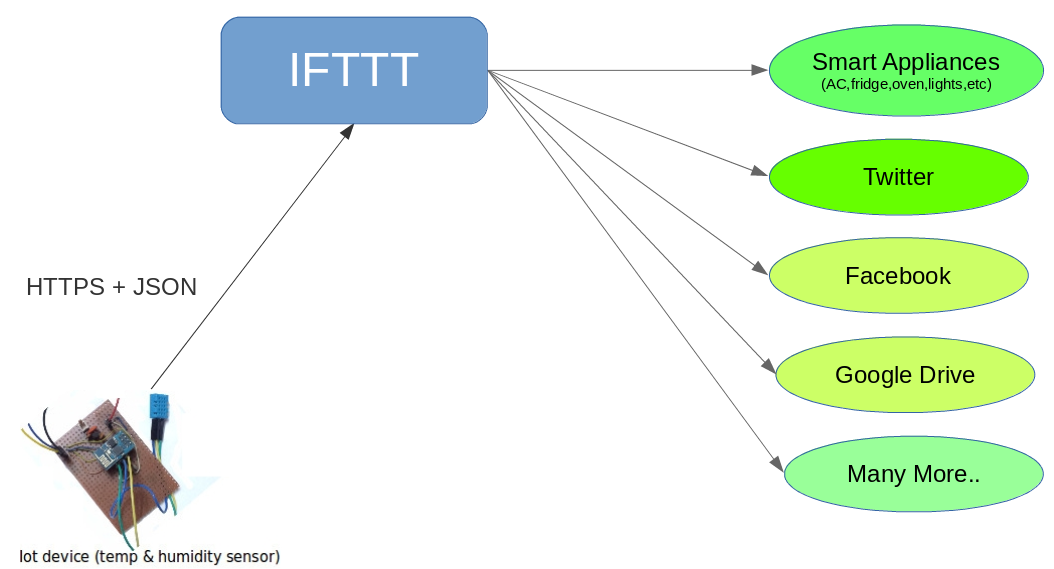
In my previous articles, I had written in detail about creating wifi enabled temperature and humidity logger using ESP8266 + NodeMCU and configuring a NoSQL(CouchDB) database to store data transmitted by it. In this article, we are going make our IoT device tweet temperature and humidity readings using IFTTT. Once we are able to connect our device to IFTTT, it opens a plethora of interesting things we can do with our device. Being able to tweet temperature and humidity is just one of them.
What is IFTTT?
IFTTT is a service which allows us to define actions for specific events. An example could be, ‘When I receive an email , send me an SMS’. IFTTT is made of ‘Channels’ and ‘Recipies’. Each ‘Channel’, supports certain actions. If you ask me, ‘Channels’ can be classified into two main categories. First type of ‘Channel’ basically poll or listen to a feed/stream and provide triggers. The other type of ‘Channel’, allows you to do something like, sending SMS, writing email or updating a document on Google Drive.
You create a Recipe using two Channels, one typically to listen to something (example: incoming sensor data) and the other to do something (example: post sensor data to Twitter). All this without writing a single line of code. A lot of people are of the opinion that IFTTT is the next big thing that is happening to the Internet.
Getting started with IFTTT
First, you should create an account on IFTTT. I strongly recommend that you familiarize yourself with IFTTT by creating few simple Recipes. Once you do that, head straight to the Maker Channel , which has been specially created to support DIY electronics. Once you ‘connect’ to this Channel, you should be able to see your ‘key’ on the Channel’s main page. This is a sceret key that should be used by your IoT device to send data over HTTPS to IFTTT. Everytime you send data using the key, the ‘Maker Channel’ is triggered. The idea is simple, we have to create a Recipe involving the ‘Maker’ and ‘Twitter’ Channel (If data received by Maker, then post it to Twitter).
Sending data to the ‘Maker’ Channel is simple. You need to send a HTTP POST request to below URL :
https://maker.ifttt.com/trigger/{event}/with/key/your_secret_key
with data inside the body of the request in JSON format shown below:
|
One important thing to remmember is to replace {event} with a friendly name that corresponds to sensor or process sending data. For example, if we had two of temperature sensors, we could create two events called ‘sensor1_data_rcvd’ and ‘sensor2_data_rcvd’. When you create a Recipe involving the ‘Maker’ Channel, you need to input the name of event as parameter.
Creating a IFTTT Recipe receive for tweeting Temperature & Humidity
Now that we are familiar with IFTTT and ‘Maker’ Channel, let us create a Recipe which will post temperature and humidity to Twitter. For this you need to ‘connect’ to ‘Maker’ and ‘Twitter’ Channels (you need to have a Twitter account). Next, follow below steps to create a new Recipe.
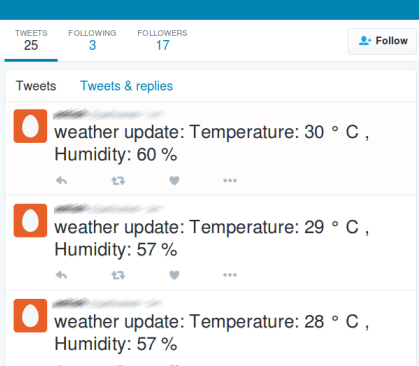
Step1 Choose Channel TriggerSelect the ‘Maker’ Channel.Step2 Choose a TriggerSimply click on ‘Receive a Web Request’ link.Step3 Complete Trigger FieldsEnter ‘tempupdt’ as the event name. Our device will publish under this event nameStep4 Choose an Action ChannelSelect ‘Twitter’.Step5 Choose an ActionClick on ‘Post a tweet’ link.Step6In the ‘Tweet Text’ textbox enter the text as shown below
- Step7: Click on ‘Create Action’ and we are done.
Now we have successfully created a Recipe which will post temperature and humidity readings to Twitter.
Programing the IoT device (temperature and humidity logger)
The IoT device is a temperature and humidity logger (ESP8266 running NodeMCU and DHT11 sensor) which I had described in my previous article. So I would not be discussing details about it’s construction and setup required to program it. In this section we will discuss in detail about the code part. One important thing to note is, we need to make HTTPS request to send data to IFTTT. For this we need to get latest version of NodeMCU firmware. We need NodeMCU v1.5.1 for this. Older versions of the firmware could be directly downloaded from their site and burned into ESP8266. However starting v1.5.1 , pre-built binaries are not provided.

This means either you have to build it from source (the last thing I want to do) or use their ‘custom-build’ service.
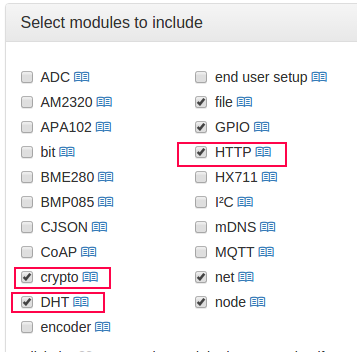
Luckily their custom-build service is super cool and allows us to create a custom build with only the components which we want. When creating a custom build, please ensure that HTTP, Crypto and DHT modules are checked,in addition to default selections.
Once you download a custom build of NodeMCU v1.5.1, please follow instructions mentioned here to burn it to ESP8266. After that is done you will need to connect the DHT11 sensor and upload the following script to ESP8266
|
In the above code please remember to change values of wifi_nw_id and wifi_pwd variables before uploading. Also please substitute {your_secret_key} with actual secret key of your ‘Maker’ Channel as described in the earlier section
Things to consider when posting to Twitter
When posting to twitter we need to be aware of daily limits on tweets. Our IoT device an in practice can generate lot of tweets. When I first programmed the device, it would give a reading every 30 seconds. Then I thought of changing the code so that it posted the data from sensor every five minutes. However,a much better way was to make our device tweet only when there is 1 degree Celcius or more change in temperature or 10% or more fluctuation in humidity readings. This way we would be able to tweet more meaningful data. Also with this approach, I believe our tweets should stay under daily limit.
Doing more with IFTTT
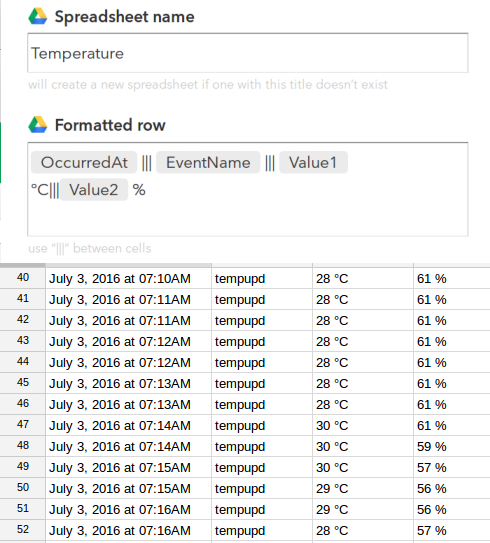
Tweeting temperature and humidity is just one of the many cool things we can do with IFTTT. We can also create a Recipe that will write temperature and humidity readings to a spreadsheet on Google Drive. Shown below is output from one such Recipe.
Another interesting use would be to control air conditioner based on temperature reading.
One important thing to note here is how easy it was to make our device post data to IFTTT’s , ‘Maker’ Channel. All we had to do was to write some code that made a HTTP POST request. Once we did that, our device is ready to talk to scores of different services without having to configure anything at our end. This is the real power of IFTTT.
A word on IFTTT and IoT
I want to end this article with my thoughts on IFTTT. I think it is a great idea, certainly one of the next big things. In todays world building a platform from scratch is not an option. IFTTT is awesome, because it serves as a glue between many established software services and platforms. There are many consumer grade IoT products/appliances (wifi enabled plugs, smart lights, surveillance cameras..) which come with out of the box integration with IFTTT. In future (and even now), I believe such compatibility will be a key selling point for such items. If you are thinking of buying a smart appliances, make sure that it has a IFTTT Channel , if not then you should certainly be reading this article.


