In this project I have used ESP8266 and DHT11 sensor to create a temperature and humidity logger, that transmits data over wifi. Currently, data is transmitted to a CouchDB instance, but with minor modifications to the code it should be possible to send data somewhere else. I have divided this tutorial into two parts. In this part, I will discuss basics of interfacing DHT11 with ESP8266 and transmitting data over wifi. In the next part (Part 2) I will discuss in detail, how to setup CouchDB to receive and store data from our device and create chart using d3.js to monitor temperature and humidity in realtime.
Hardware
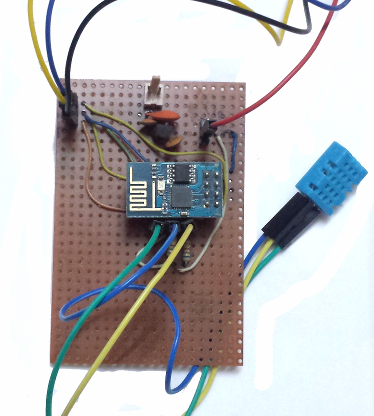
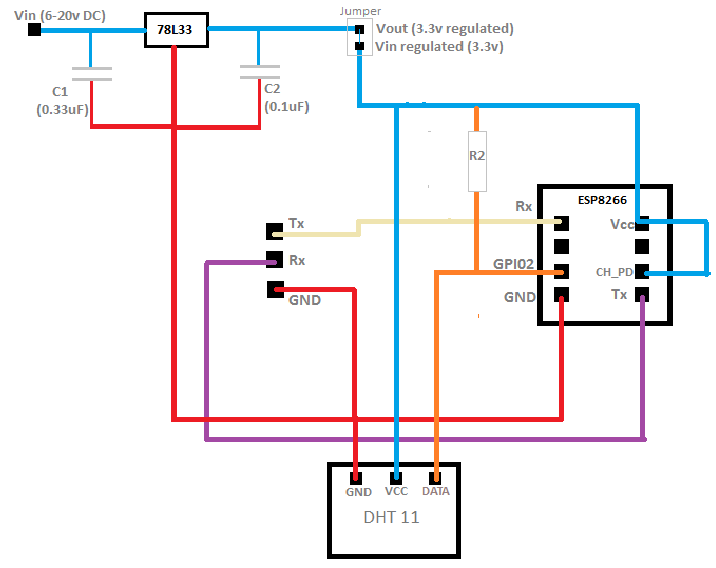
This project uses the same layout which I have used in my previous IoT projects. DHT11 is an integrated device which works as a temperature and humidity sensor. You can find more about it here https://www.adafruit.com/product/386. The only difference is, instead of an OLED display, we are using the DHT11 sensor. DHT11 uses propritery 1-wire bus, which also happens to require a pull-up register(R2), which was already soldered on my board (to support I2C communication with OLED display).
From what I read on the internet the DHT11 is not very accurate, it’s counterpart DHT22 has much better accuracy. But the real difference is cost, I could get DHT11 for around USD 1.00 in India from an online retailer. The pins on device are thin, and don’t fit snuggily when plugged into female jumper cables. If you are using jumper cables (like me) twist the pins so that jumper cable fits properly.
I have also seen DHT11 been sold in form of ‘sensor module’, which is nothing but a DHT11 attached to a tiny board with header. The header comes in handy when you want to use jumper cables to connect it to a circuit board (arduino/rasberry pi). Most DHT11 modules are unreasonably expensive compared to the standalone device.
Software
When I researched about interfacing DHT11 , I came to know that it requires precision timing in order to read the sensor’s output. ESP8266 running NodeMCU seemed like a poor choice for the purpose. But I still decided to give it a try mainly because NodeMCU has built in library for reading DHT11 and DHT22. I would term my experiment mostly successful, because with the below code, I am able to read the sensor twice within a minute and log the data over HTTP. However, there are those rare occassions when I get a timeout or checksum error from the sensor.
couch_ip="couchdb_ip" |
Here are some important points about the lua code which I have shared above. To send data to CouchDB, our code simply sends a http POST request to a CouchDB url with ‘Content-Type: application/json’. It is important to get ‘Content-Length’ correct, else CouchDB will respond with ‘Bad request’. The payload when I have temperature and humidity reading is:
{"t":22,"h":80,did:'s01'} |
In case of checksum error I send:
|
For timeout:
|
The “did” field in the JSON corresponds to the device id of the each sensor (which can be anything). The code inside the function ‘checkConnection’ keeps on checking if it is connected to the internet. If the device gets disconnected, it will attempt to connect again.
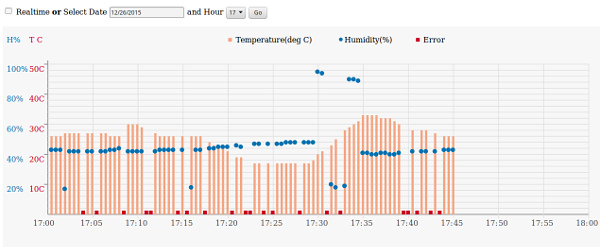
Why CouchDB
For this project I have used CouchDB as the datastore. I have talked about CouchDB in one of my articles. CouchDB is a NoSQL datastore, which works over HTTP. This means that CRUD operations on data can be done via sending JSON inside standard HTTP request. In my next article I will discuss in detail, why I chose CouchDB and how to configure it to work as backend for IoT projects. I will also tell you how I created the interactive bar-chart shown below to monitor temperature and humidity readings.