IoT (Internet of things) is a hot topic these days. Simply put, IoT refers to a network of small interconnected devices that can communicate with each other.In last few years, we have seen steady flow of inexpensive and powerful programable embedded devices/boards. Arduino is an excellent example. These days every other gadget or device wants to have the ability to connect to internet wirelessly. In this article I will introduce you to the ESP8266 module which you can use in your next IoT inspired project.
What is a ESP8266 module ?
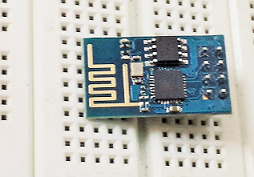
ESP8266 is an IC created by Espressif Systems, which offers wifi networking cabilities. A module, simply integrates this IC with some other components and becomes an easy to use component.In this article I have described the most common form of ESP8266 which comes as a 8 pin module.
Some of its most important features are:
- Low cost (USD 2 -5 per piece !)
- Works in normal as well as access point mode.
- Low voltage operation (3.3v).
- Serial interface to program/communicate with the module.
- Has everything required for wifi networking (supply only power).
- 64KBytes of instruction RAM, 96KBytes of data RAM and 64KBytes boot ROM.
- Two GPIO pins (support PWM).
- Ability to be programmed/flashed via serial interface.
- Can be easily interfaced with a microcontroller or used standalone.
- Choice of different firmwares.
Though the features of the module look impressive, those of the chip itself are even more amazing. It has lot more GPIO pins and features which are not fully exposed by this particular module.
Programming the ESP8266 module
This is where the module really shines. There are two popular firmwares it can support, Espressif firmware and NodeMCU . the Espressif firmware is AT commands based. Some modules come with this firmware pre-loaded. The NodeMCU firmware basically adds a Lua interpreter to the module. It then becomes possible to use NodeMCU’s rich API to send Lua scripts to the module over serial port. I find it simply amazing to be able to program such a small device using a language like Lua. This also gives me an opportunity to learn Lua. There is also Micro Python firmware for the module which I haven’t expored much.
Toolchains are available for loading different types of firmwares to the module. Loading firmware is done over serial port by connecting GPIO0 pin of the module to GND. In the next section I will be discussing procedure to load the NodeMCU firmware into ESP8266 module and using it.
Burning the NodeMCU firmware
You will need the following things:
- USB to UART Serial converter (should support 3.3v)
- A breadboard
- Jumper cables
- The latest version of NodeMCU firmware
- NodeMCU flasher tool for windows (since I am using windows)
- Putty for windows (or any other program that allows communicating with COM port)
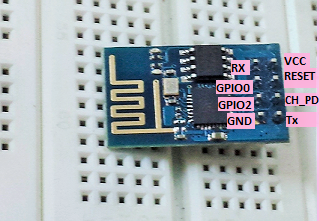
To burn firmware into ESP9266 module, you need to connect it to your serial converter as shown below.
Important
Most USB to serial adapters support 5v. If you apply 5v to VCC pin of the module it will get damaged permanently. I can tell you from my experience :-) . So please ensure that your serial converter is 3.3v compatible. You can get a serial converter which supports both, 5v and 3.3v pretty cheap.
| ESP8266 PIN | Serial converter PIN |
|---|---|
| VCC | To 3.3v PIN |
| GND | GND |
| TX | RX |
| RX | TX |
| CH_PD | 3.3v |
| GPIO 0 | GND |
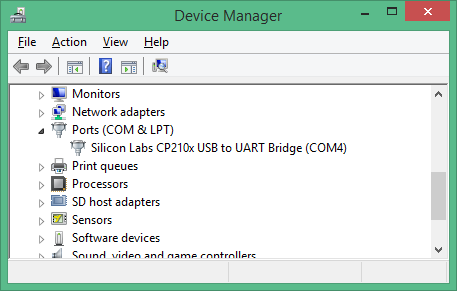
Next connect your serial converter to your PC’s USB port. In ‘Device Manager’ you should be able to see a new COM port as shown below. On my PC, my converter creates a COM4 port.
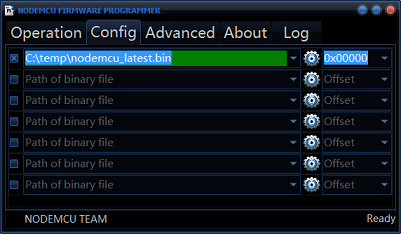
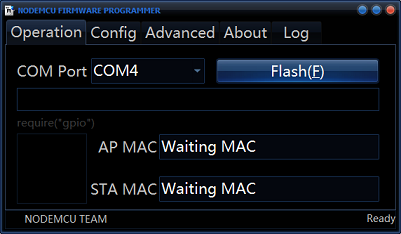
Now unzip the ESP8266 flasher tool and run ‘ESP8266Flasher.exe’. Once the program starts click on the ‘Config’ tab and select the downloaded Node MCU firmware file.
Click on the ‘Operation’ tab , select the correct COM port and click on ‘Flash’ button. If everything was setup right, you should see a progressbar on the screen showing status of firmware update. The whole process can take around 2-3 minutes.
If nothing happens after clikcing ‘Flash’ , check the connections and re-confirm if selected COM port is correct. You can also change the baud rate and retry.
Once the firmware update is over, you can disconnect the ESP8266 module. Now disconnect GPIO0 from GND, and connect the module back to the serial converter as before. Start Putty.exe and select a ‘serial’ connection as shown below. Then click on ‘Open’. You should be able to see a terminal window with a ‘<’ prompt. Try following command:
majorVer,minorVer,devVer = node.info(); |
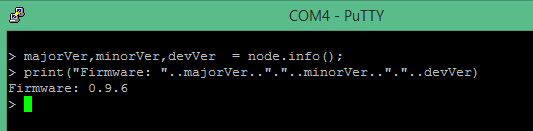
You should see the version number of the Node MCU firmware. This indicates that you have successfuly installed NodeMCU firmware on your ESP8266 module.
What next ?
What I really like the most about this module is it allows you to program in a higher-level language without much hassle. Burning firmware and interfacing is also super easy. In some ways I find it more interesting than Arduino (especially if I can get a module with more GPIO pins). Once you have the firmware installed, you should take out some time to visit the API documentation page and play with your module. The interactive Lua enviornment is a joy to work with, in my opinion. You can experiment and learn a lot.
You will quickly realize that when you disconnect the module, your programs are lost. In my next article, I will post information on saving Lua scripts directly to the module itself. Then it is possible to auto-run your Lua script everytime the module is switched on. Keep reading my website for more on this awesome device.


