In this article I will show you, how we can create a very basic wifi network detector using a ESP8266 module, a LED and some code. If you are new to ESP8266 I strongly recommend you read my introductory article on it. We will use a ordinary LED connected to one of the GPIO pins of ESP8266 to indicate status of network. If network is available(and is in range) the LED will be on. If network is unavailable or out of range the LED will start blinking. The best part of this project is, it does not need a separate micro-controller and can be battery powered.
The Hardware
You will need following items:
- USB to UART bridge (should support 3.3v).
- ESP8266 with NodeMCU firmware .
- A normal LED and 1KOhm resistor.
- A breadboard.
- Jumper wires .
The USB to UART bridge is required to transfer our program to the ESP8266. We will write a program in Lua to search for a wifi network at regular intervals and control the LED. We will use a python based tool called Lua_tool to transfer our programs to ESP8266.
Important
Most USB to serial adapters support 5v. If you apply 5v to VCC pin of the module it will get damaged permanently. I can tell you from my experience :-) . So please ensure that your serial converter is 3.3v compatible. You can get a serial converter which supports both, 5v and 3.3v pretty cheap.
The Software
Given below is a very simple Lua script (wifi_detect.lua), which is used to detect a wifi network and control the blinking of the LED.
pin = 4 |
The pin variable is assigned an integer which corresponds to GPIO2 pin of the ESP8266 module. Next, the ssid variable should be set to the SSID (name) of your wifi network. The check function iterates through list of ssids of all available wifi networks and searches for the specified network (your_wifi_nw_ssid in this case). If it finds one, it sets the GPIO2 pin to high, which makes the LED glow steady. If no matching ssid was found, it starts pwm (pulse-width modulation) on GPIO2 which makes the LED blink.
The first parameter in the call to pwm.setup is the index for GPIO2 team. The next parameter is frequency, in our script it is 1 Hz. The last parameter is duty cycle, whose max values is 1023. A value of 512 means 50% duty cycle. This means that for each second the pin will be high 50% time and low for remaining period. This makes the LED blink. The last line, starts a timer which runs our script repeatedly after every 5 seconds.
Writing the Lua script to ESP8266 module
As described earlier, we will use a python based program , called lua_tool to write our Lua script to the wifi module. To do this, first connect the module to a USB to UART bridge as shown below. The value of current limiting resistor should be greater than 470ohm in my opinion, I have used 1KOhm. Also, I am assuming that you have already burned the NodeMCU firmware to your wifi module. Please read my earlier article on ESP8266 for more details.
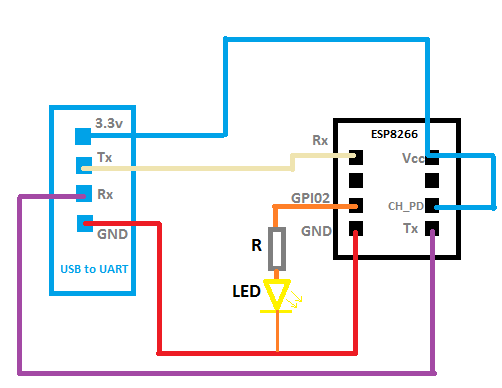
So connect USB to UART bridge to USB port of your PC and serial port pins of the bridge to the ESP8266 as shown above. Now you will need to download Lua_tool and Python 2.7 (don’t use the latest version). Once you have installed Python, you can create a upload.bat file with following contents:
C:\Python27\python luatool.py --port COM4 --src wifi_detect.lua --dest main.lua --baud 9600 |
Make sure to specify the correct port, on my machine the bridge always creates COM4 serial port. Run the batch file. Assuming that it ran successfully, you can now execute your script by connecting to COM4 using Putty and simpy typing:
dofile('main.lua') |
If you want your program to run automatically on every boot, create a new file called detector_init.lua with following content:
print('init.lua ver 1.2') |
The modify the contents of batch file to:
C:\Python27\python luatool.py --port COM4 --src wifi_detect.lua --dest main.lua --baud 9600 |
The NodeMCU firmware executes the init.lua after ESP8266 restarts, adding the dofile(‘main.lua’) command executes main.lua file which contains our wifi detector script. Test the program by switching on/off your wifi router and by moving your ESP8266 far from your router. The LED should blink if your wifi network is found.
Final thoughts
This project was simple and fun. It required no special parts and allowed us to program and learn about the ESP8266 module. We actually ended up creating something useful with very effort. Do try it out and share your experience. Thanks for reading !


