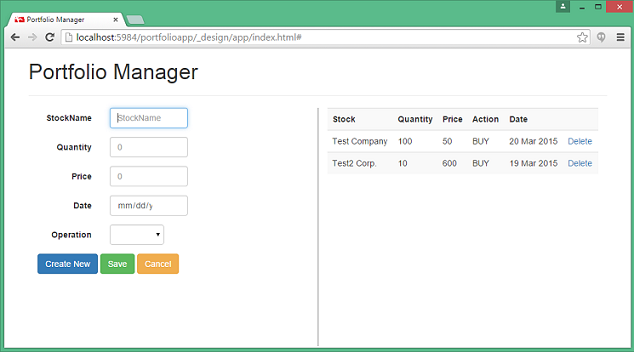
It has been a long time I posted something on my website. I was busy learning about NoSQL , mainly CouchDB. So, in this article I show you how to create a basic portfolio management web application using CouchDB and AngularJS. Our application will allow the user to add entries to a stock portfolio. Each entry will capture name of the stock, quantity, price, transaction type (bought/sold) and the date when the transaction was carried out. Also a section on the page will show list of entries in the portfolio and allow deleting and selecting a particular entry (for editing).
What is so special about CouchDB ?
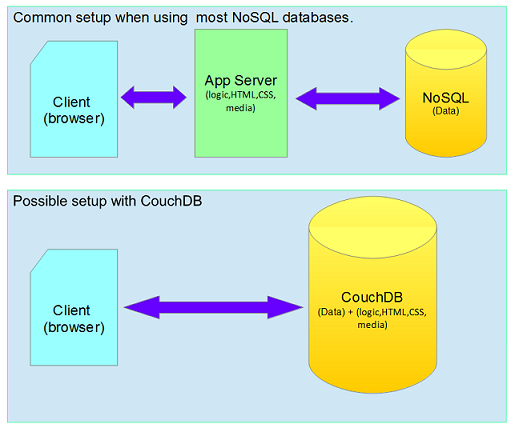
As you may have already read, many NoSQL databases store data in form of documents, so does CouchDB. What is different with CouchDB is it acts like a webserver for your application. Yes, a single server that acts like a database and application server. Using a framework like AngularJS and flexibility offered by schema-less design of CouchDB, a broad category of web applications can be created painlessly and fast. In this article, I cover the process of creating the Portfolio application with CouchDB.
What do we need.
We need the following things:
- CouchDB installed on your local machine. Please visit their website to download binaries for your OS. I have used Windows in this tutorial.
- NodeJS installed on your system.
- AngularJS and Bootstrap (which we will pickup from CDN).
- Some knowledge and experience with AngularJS/javascript and JSON (not mandatory).
Creating our database
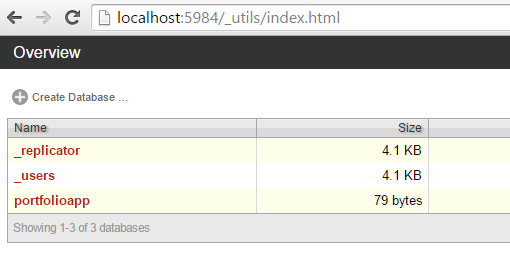
Luckily, CouchDB comes with online administrative tool by default, know as Futon. You can access Futon by starting CouchDB and visiting following URL http://localhost:5984/_utils/. Using Futon, let us create our first CouchDB database, called ‘portfolioapp’. This should be very easy. Since this is a NoSQL database, we don’t have to worry about the schema. We can concentrate directly on creating our front-end/GUI.
Using CouchApp to scaffold our application
As you might have realized, we didn’t do much. All we did was created a empty database. In this section, we will use AngularJS and create a front-end (GUI). Here, I would like to introduce a tool called CouchApp. This is a very handy tool which can help you create folder structure for your application and add your application files (HTML, images, scripts) to CouchDB very easy. For this tutorial we are using the NodeJS based version of CouchApp. So, to install CoucApp do this:
C:\>cd apps |
The first command simply navigates to a directory where we want to create the new application. Paths may vary on your system, so please remmeber that. Second command installs CouchApp to this directory.The third line creates a new directory ‘portfolioApp’ with boilerplate code our application. For some reasons, third line gives me an error on my machine (Windows), but the directory is created successfully. At this stage if you open C:\apps\portfolioApp\attachments directory, this is what it should look like:
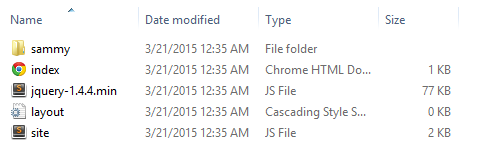
There is nothing particulary important about the directory structure. We can change it to our liking. Our application will consist of only two files, a HTML page and javascript file containing angular code. So we delete everything from this folder first. Download the zip file containing the code. copy the html file from the downloaded archive and paste in C:\apps\portfolioApp\attachments folder. Copy the scripts\portfolio.js file from the archive and paste in C:\apps\portfolioApp\attachments\scripts (you may have to create the scripts folder if you deleted it.)
One important thing which we need to do is create a CouchDB view which will show list of stocks in our portfolio. This is a one time activity, which we can be accomplish via Futon. We can also have CouchApp do this for us every time we deploy our application to CouchDB. Simply modify the C:\apps\portfolioApp\app.js file which was generated by CouchApp and change the line
ddoc.views = {}; |
to
ddoc.views = { |
Interesting thing to note is we have not definied a schema anywhere in our database, yet we are creating a view which assumes and uses some properties from our documents. This is fine because our application makes sure that every document it creates will have these fields. Hence we have not done any checking or error handling in the view (which we should ideally do). Thats it, we are done. We have created a GUI to perform CRUD operations for our application.
Understanding the code
The front-end application (GUI) to consists of a HTML page and a javascript file. The total code is less than 200 lines (including HTML and javascript). AngularJS with its templating and MVVM(two-way binding) capabilities allows us to achieve client side functionality with very little code. In our javascript, we create a service, called ‘portfolioRepository’ to handle iteraction with CouchDB. This service contains methods to perform CRUD operations using the Rest API provided by CouchDB. All it does is make ajax calls to couchDB. One important this to note is we had created a CouchDB view to display list of portfolio items. For displaying the list on GUI we simply a send HTTP GET request to query the view and get results. Given below is code for the service:
angular.module('portFolio') |
Next, we created a controller called ‘portfolioController’ which is bound to our HTML template for display and entry of data. Explaining it in detail is beyhond the scope of this article, but if you have worked with any MVVM framework , you will get an idea. Give below is full code for our controller :
angular.module('portFolio') |
The portfolioApp/attachments/index.html is our view which binds to the controller and allows user to view/add/edit/delete items. You can have a look at the file, it contains angular expressions for binding and event handlers on user actions.
Uploading the application to CouchDB and running it
To upload the app to CouchDB using CouchApp simply execute:
C:\apps\portfolioApp>push app.js http://localhost:5984/portfolioapp |
If everything went successful this is what you should be able to see using Futon. Our files are uploaded as special type of document with id ‘_design/app’ . Inside this documents all individual files are stored as fields.

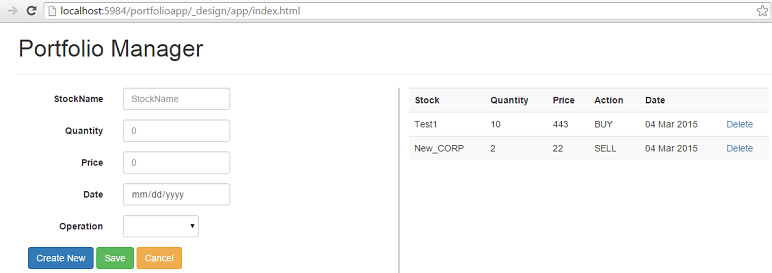
You can now run the application by accessing http://localhost:5984/portfolioapp/\_design/app/index.html.
Try adding a couple of records like I did. You should be able to see those in our UI as well as inside CouchDB with Futon.

Final thoughts
I hope this tutorial helps to illustrate how CouchDB can act as database and application server at the same time. This feature can be very useful for certain types of applications (like reporting, data entry, web based adminstrative tools, data driven websites, etc). Tools like Node.js and AngularJS have advocated standardization and consolidation of programing language and tools for creating web applications. CouchDB tries to take this a little further by trying to remove distinction between an application server and database server by binding them with popular and well adopted technologies like javascript, JSON and REST.


