Imagine packing the intelligence of a neural network into a device smaller than your palm - how tiny can we go? It turns out, pretty small! With the right techniques, we can run some serious AI on a modest board like the Raspberry Pi Pico.
In this article I discuss how we can create a single word speech recognition system using neural networks on the Raspberry Pi Pico. The code and instructions mentioned in this article were tested with a Raspberry Pi Pico board, but should work with almost any board that supports CircuitPython. This work is mainly inspired from a tutorial on tensorflow’s website. While my work is experimental, but it is fun to play with 🙂.
Video of the project in action.
💡 Link to the project’s repository: https://github.com/code2k13/pipico_speech_recognition
Hardware Requirements And Circuit Diagram
For hardware requirements, circuit assembly, and steps to get it working, please visit the project’s GitHub page.
In the article below, I discuss some important topics related to the project and the inner workings of the code. This article should give you a good idea of capturing speech using a microcontroller and feature engineering applied in this project. This should help you understand the code better and help me improve it.
Why CircuitPython?
Of course, writing code in C++ using the Pi Pico SDK would be more efficient. However, that approach requires setting up a build process to convert C++ code into UF2 files. Additionally, adding different peripherals becomes complex, and you need to find drivers for them.
Initially, I was unsure if CircuitPython could handle audio sampling. But after some trial and error, using a tight while loop seems to work effectively. Plus, it’s much easier with Python to test code on a PC and then transfer it to CircuitPython on the microcontroller. The ease of making edits is also unmatched.
CircuitPython dramatically reduces the time needed to conduct experiments (although at the expense of performance).
Recording Speech Using a Microcontroller
Follow the instructions and code from this notebook.
The notebook will enable you to capture speech from the Pi Pico board connected to a microphone over the serial port. It should sound something like this:
One second audio clip of the word 'start'Extracting Features from the Recorded Speech
Once we are able to capture audio with some fidelity, it’s time to extract features from the audio. We are capturing 1-second audio at 8 kHz, which gives us roughly 8192 samples. Given below is what the plot of a sample audio file looks like: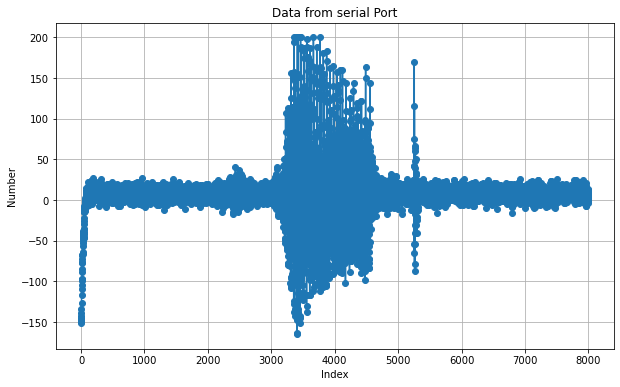
Now, if we calculate the Fast Fourier Transform of the signal and plot the absolute value of the audio, we will see something like this:

There are two interesting things about this plot. First, it is symmetric about the center frequency, which is good since we can only consider the first half of the output. Secondly, we totally lose time information, which is not good and directly impacts the accuracy of our prediction. To overcome this, we perform STFT of the signal using the steps below:
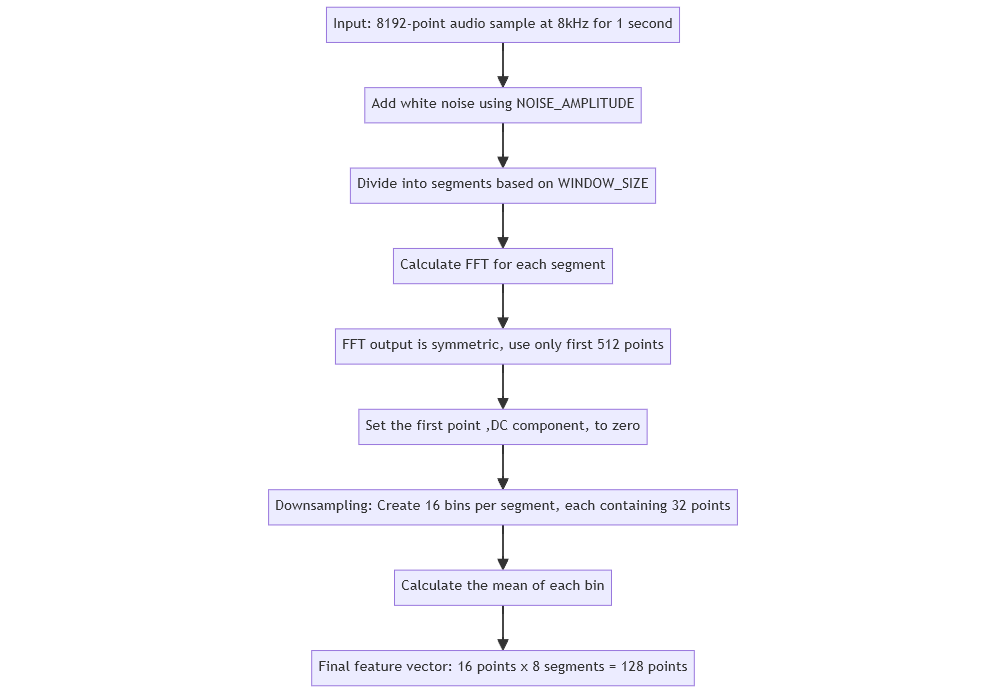
Shown below is the actual feature vector for the audio signal generated by our code. It has 128 data points. We are able to reduce the original signal, which contained 8192 data points, to 128 data points. Our feature vector has frequency and time domain information.

Note that the approach we took is very different from what is published here. Two notable differences are:
- We have calculated STFT without windowing.
- Our output is a 1D array, whereas in the article, a 2D image is created from the audio, which is then fed to a CNN for classification.
Preparing Training Data
Now that we have our feature extraction taken care of, we need training data for our project. For training, we use the Google Speech Command Dataset from Kaggle. This dataset has audio recordings of many common words spoken by different speakers. Luckily, this dataset also includes “white noise” audio, which we can add to the training data. Creating training data is easy; we do the following:
- Create positive samples from the folder containing the word of our choice.
- Create negative samples from all other folders.
- Resample all samples at 8 kHz.
- Add white noise to positive and negative samples.
- Calculate STFT as mentioned above for each sound sample and get the feature vector.
💡 The code for training and feature extraction can be found here.
Choosing a RAM-Friendly ML Model for Pi Pico
Finally, we have to decide on the architecture of the neural network that we plan to use for classification. We need to use a very simple neural network so that it is small and easy to port to CircuitPython. We create a tiny neural network with just three Dense layers. The code for the neural network is shown below:
model = Sequential([ |
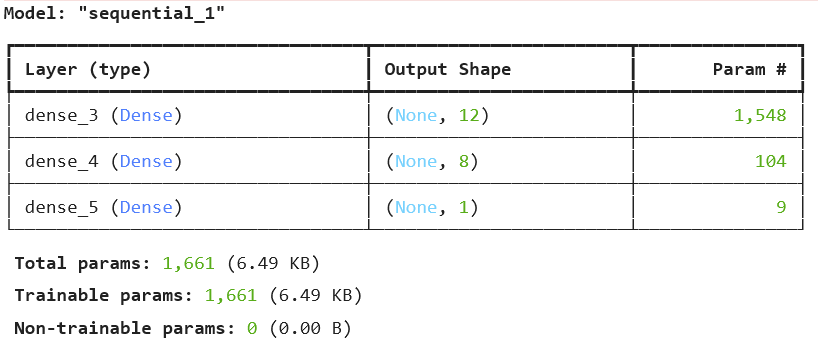
This model can be easily converted to “pure” CircuitPython code using the ulab.numpy library. Here is a sample file containing the converted code, which can run under CircuitPython. Note that the neural network has just 1,611 parameters. The output file, which is Python code, is around 27 KB after minification. It takes around 30 seconds for CircuitPython to load and interpret this file. Had we used C/C++, this would have been much more efficient (at the cost of complexity, I guess!). You can train models for as many ‘words’ as you like using the training notebook. However, I don’t think CircuitPython will be able to load multiple models in memory (something you can try and let me know!).
What Is Not So Great
As I mentioned, to keep things simple, we have made multiple trade-offs, which can be improved in the future. Currently, these are some issues I have observed with the setup:
- The Pi Pico intermittently gives a USB error when running this code and connecting to a PC. When this happens, it doesn’t show up as a USB drive. This has been observed on Windows 10. Restarting the computer seems to work. If that does not work, reset the flash memory and reinstall CircuitPython.
- Slow startup (loading the model files takes time).
- Lower accuracy; sometimes detection gets triggered for unrelated words.


