CircuitPython is loved for its simplicity, excellent documentation, and rich ecosystem of libraries. But when it comes to machine learning, especially deep learning, things quickly get complicated.
Training models? Impossible on-device.
Running inference? Painfully slow if done in pure Python.
In this article, I’ll show you a practical and scalable approach to bridge that gap:
Train your neural network in TensorFlow or PyTorch, and run it inside CircuitPython using a single line of Python code.
outcome = digit_classifier.invoke(image_data) |
Yes — real CNN inference in CircuitPython, backed by native C code, without rewriting your model logic by hand.
Why This Approach?
CircuitPython excels at developer experience:
- Clean APIs
- Excellent documentation
- Huge collection of drivers and libraries
👉 https://circuitpython.org/libraries
But it is not designed for heavy numerical workloads like neural network inference.
I’ve previously experimented with:
- Porting Support Vector Machines (SVMs) to pure CircuitPython
- Writing CNN inference logic manually in CircuitPython
While technically possible, these approaches suffer from:
- Tedious development
- Error-prone math
- Very slow inference (often seconds per run)
Instead of fighting CircuitPython’s design philosophy, this approach embraces it.
The Core Idea
Train the model on your computer
Export the model to ONNX
Convert ONNX → C, using
onnx2cCompile the model into CircuitPython
Expose it as a Python module
The result is the best of both worlds:
- Python-level simplicity
- C-level performance
Prerequisites
Before starting, ensure you have:
- CircuitPython (source build, tested with commit fc6bf9648b)
onnx2c, tested with commit e0d9b35
A TinyML-suitable neural network
- Basic C/C++ understanding. You won’t write much, but knowing headers and build systems helps
📌 If you are new to TinyML, here are some cool TinyML projects to get you started:
https://ashishware.com/tags/tinyml/
Step 1: Build CircuitPython from Source
CircuitPython provides excellent documentation for building from source:
📘 Official guide
https://learn.adafruit.com/building-circuitpython
Key Things to Verify
- You are using GCC 14 for ARM cross-compilation (as required by recent builds)
- You can successfully generate a UF2 file:
make BOARD=raspberry_pi_pico |
If this works, your build environment is ready.
Step 2: Train and Export the Neural Network
The model used in this article is a small CNN for handwritten digit classification. It is a tiny CNN model that takes a 30x30 handwritten digit image as input and tries to classify the digit (0-9). Here is link to the notebook that trains the model and exports weights to onnx.
https://www.kaggle.com/code/finalepoch/digit-classifier-to-onnx
⚠️ Important:
Your model must be TinyML-friendly:
- Small input size
- Few layers
- No unsupported operators
Step 3: Build and run onnx2c
onnx2c converts an ONNX model into plain C code, which can then be compiled into any embedded project. You will need to clone the repository and build the tool from source first.
📦 Repository:
https://github.com/kraiskil/onnx2c
Follow the instructions to on the website to generate a pure C version of your model from onnx dump of your tensorflow or pytorch model:
onnx2c cnn_model.onnx > digit_classifier.c |
No CircuitPython-specific steps are required here. You can also download a pre-built file for handwritten digit recognition here :
https://github.com/code2k13/neural_network_cp/blob/main/src/digit_classifier.c
Step 4: Integrate the Model into CircuitPython
This is where everything comes together.
4.1 Create a New Shared Binding
Inside the CircuitPython source tree:
circuitpython/ |
Add the following files:
Shared bindings are how native C modules are exposed to CircuitPython.
4.2 Define the Model Interface
The digit_classifier.h contains signature for the function to invoke model:
|
This function signature is not generated by onnx2c and has to be created manually. It acts as the bridge between Python and C.
4.3 Enable the Module in the Build System
Add following line to ports/raspberrypi/mpconfigport.mk
CIRCUITPY_ADD_MODULES += digit_classifier |
Add below line to ports/raspberrypi/Makefile
SRC_SHARED_BINDINGS += shared-bindings/digit_classifier/__init__.c |
Add below line to py/circuitpy_mpconfig.h
4.4 Build and Flash
make BOARD=raspberry_pi_pico |
Flash the generated UF2 file to your board.
Step 5: Run Inference from CircuitPython 🎉
import digit_classifier |
Your neural network is now running inside CircuitPython, using compiled C code.
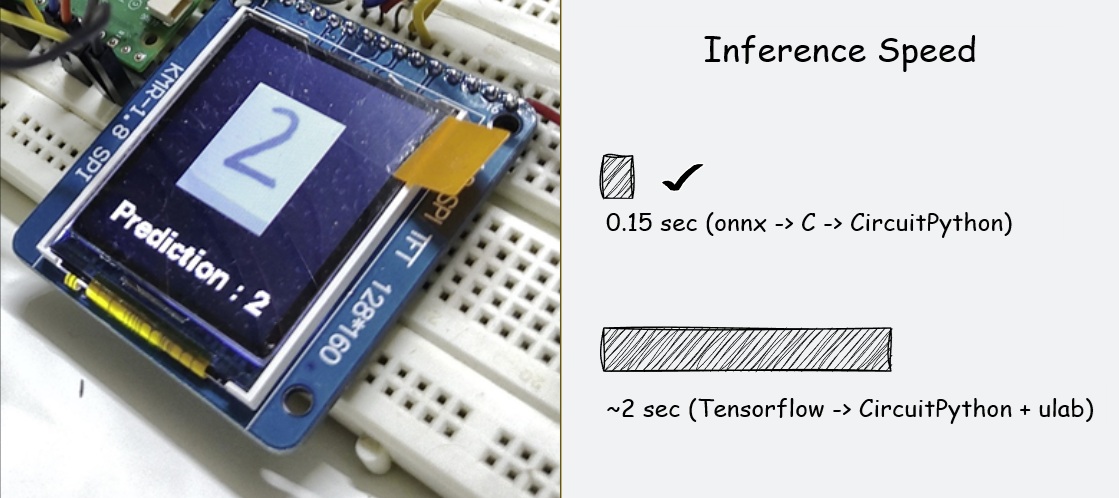
Performance Results
| Approach | Inference Time |
|---|---|
| Pure CircuitPython CNN | ~2 seconds |
| C-backed ONNX model | ~0.16 seconds |
That’s over 10× faster, with a cleaner and more maintainable workflow.
Complete Working Example
A fully working reference implementation is available here:
https://github.com/code2k13/neural_network_cp/tree/main/example
This includes full content of modified files along with end to end example, that captures pictures using OV7670 camera and displays classification results on tiny TFT LCD screen.
Conclusion
This experiment significantly changed how I approach ML in CircuitPython.
Key Takeaways
- ✅ Easier than expected
- 🚀 Massive performance improvement
- 🧠 Train once, deploy anywhere
- 🧩 Reusable integration pattern
Most importantly, this article demonstrates a repeatable blueprint for embedding deep learning models into CircuitPython—without sacrificing performance or developer experience.
If you love CircuitPython and want real ML inference on microcontrollers, this approach is the most practical path forward today.


