Introduction of AJAX Control Toolkit has opened many interesting possibilities for developing rich UI in ASP.NET. Add an awesome IDE like Visual Studio to it, and you can get astounding results without doing much. In this article we will see how to enhance client side validators using AJAX Control Toolkit. Given below are screen shots of what we are trying to achieve. The whole purpose is to improve user experience with very little effort.
- Download the source
- Download AJAX Control Toolkit (if you dont have it)
- Run it by following the instructions in ‘readme.txt’ file of downloaded archive.
Creating a simple form
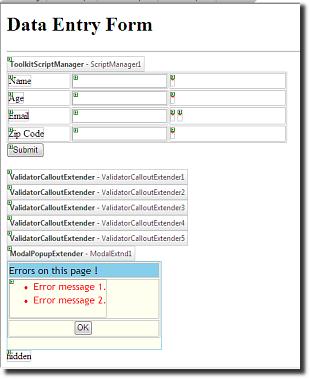
Using, Visual Studio (or Visual Web Developer) create a new ‘AJAX Control Toolkit Website’. I created a simple webform which looks like to this:
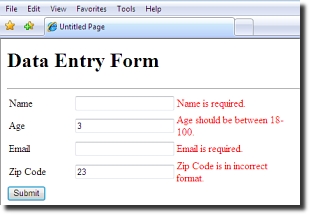
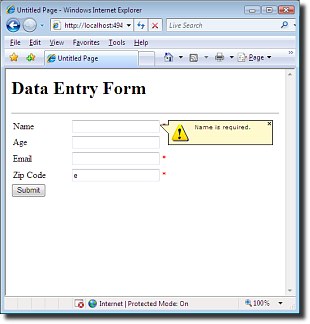
As you can see, it looks like any other form you might design with ASP.NET. It has few input boxes, and labels corresponding to them. I have added some validators for each textbox. Name, email are made mandatory using ‘RequiredFieldValidator’. Age must be between 18-100, which is validated by ‘RangeValidator’. There are ‘RegularExpressionValidator’s for email and Fax numbers. And yes, we have a ‘Submit’ button too! A simple ASP.NET page.
Adding those cool validation callouts
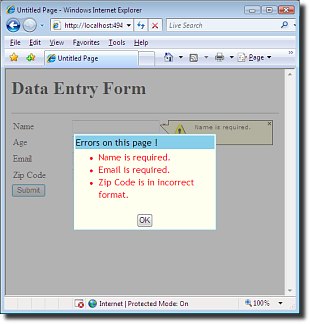
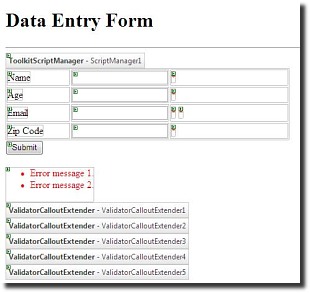
First we place a ‘ValidationSummary’ control on the page. So all our errors can be shown in one place. This will be useful to implement the modal dialog in next section. Notice that I have set the ‘Text’ property of validators to ‘*‘, since we want the actual error message to be shown on the validation summary. Callouts were accomplished using the ‘ValidatorCalloutExtender’ from AJAX Control Toolkit. Just drag and drop a ‘ValidatorCalloutExtender’ onto the screen from toolbox. Set the ‘TargetControlID’ of this extender to the ID of our validator. I have five validators on my page, so I used equal number for ‘ValidatorCalloutExtender’. One for each validator. Modify ‘TargetControlID’ of each extender to point to a validator.
Incredibly, that is all which is need to get those nice callouts. Run your page and click submit without entering anything in the form. You should see those callouts. Try entering wrong information in any of the textboxes, a callout will magically appear near it, showing the error message of the validator that failed.
Creating the Modal Dialog (With diabled background !)
The best part of our modal dialog box is that it disables the parent/window completely. It adds a translucent layer over the background which makes it look really neat. Here again, the AJAX Control Toolkit comes to our help. The ‘ModalPopupExtender’ is excatly meant to do such things. Just drag and drop one the screen. After that we create a DIV that will act as popup window for us. The markup for the div is given below.
<ajaxToolkit:ModalPopupExtender ID="ModalExtnd1" |
We have set ‘PopupControlID’ property of ModalPopupExtender, to ‘SummaryDiv’ which is actually the id of the <div> we just created. The ‘TargetControlID’ property of ModalPopupExtender, just needs to be set to something. In our case we will set it to point to a hidden label. This is because want to supress default show/hide functionality of this extender. Our <div> consists of a HTML button, on clicking of which the modal dialog box is hidden. Also note that we have moved the validation summary inside our <div> tag.
Let us now see the CSS for our example.
<style type="text/css"> |
There are three classes defined here. The ‘popupbg’ class is assigned to ‘BackgroundCssClass’ poperty of ModalPopupExtender. Note that we are explicity setting the opacity of background layer of the modal dialogbox. Now, some javascript. The page contains a javascript function which is called to show or hide the modal dialog, on click of the submit button. This function has to be intelligent enough to show the modal dialog only if a client validation fails.
<script type="text/javascript"> |
Here we make use of ASP.NET’s client side validator API. Call to ‘Page_ClientValidate’ causes all validators to fire. If any one fails the golbal javascript variable ‘Page_IsValid’ is set to false. Now to show/hide the modal dialog box we will attach a handler to the submit button as follows in serverside code:
protected void Page\_PreRender(object sender, EventArgs e) |
Now just run the example. Enter some junk data, you should see the modal dialog box.
But there is one small problem, which at least I faced. If ‘display’ for the <div> is set to ‘none’ it doesn’t show up, though the background is disabled. So I had to set the display to ‘block’. But this gives other problem, the <div> is visible for fraction of second, as the page loads. To solve this I had to adopt this (somewhat inelegant) approach.On the page set:
<body onload="init();"> |
Run the example again. This time the


