This article is about creating a simple web based event log monitoring application that uses “server push” to update data. It shows how to use WebSocket to implement “server push” technology using C#. I have written a very simple multithreaded WebSocket server for the example presented in this article. If you are new to WebSocket please visit this site http://en.wikipedia.org/wiki/WebSockets . WebSocket is relatively new technology, with lot of potential. In this article, we will see steps involved in creating a very simple WebSocket based application.
Download code for this article
Client Application
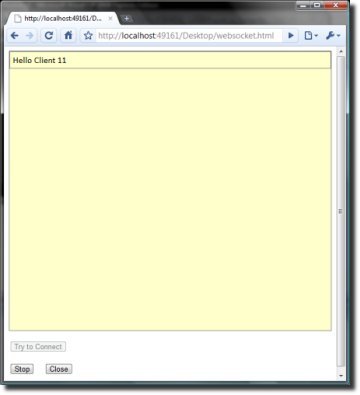
The client here is a single page application written using HTML and Javascript. However to run the client , you will require a browser which supports WebSocket. I have developed and testing the application using Google Chrome version 5.0.375.127. It should work with Firefox 4, but I haven’t been able to test. Attached below is a screenshot of the application. Our client application displays EventLog events in real time. As soon as an event is entered in systems EventLog, it is displayed to the user. There are three buttons on the client interface. Clicking on the “Try to Connect” will initiate a WebSocket connection. The “Stop” button will stop listening to server broadcast. This was included to demonstrate two way messaging. The “Close” button will close the connection. Now let us look at the javascript code which makes the client work:
function btnConnect_onclick() { |
The code above is called when the user clicks on “Try to Connect” button. Here we first create a new “WebSocket” object, by passing the URL of the server. The “ws.onopen” function gets invoked when a connection is opened successfully. Sending data to server after that is as simple as calling “send” method as shown in code above. The “ws.onmessage” function is invoked on successful receipt of data. The good part here is that the protocol makes sure that it is possible to return all data sent by server in one go (as opposed to reading from a stream). The “data” property on the parameter to this function contains data sent by the server. The “ws.onclose” close method gets called when either the “server” or “client”, terminates the connection. In this function we are changing the UI properties of the buttons.
function Button1_onclick() { |
The code above is for two way communication between client and server. There is a common button “Start/Stop” using which user can tell the server to temporarily stop sending updates. To stop/restart listening, client sends the text “STP” and “STR” respectively. So, this is all the code which we need for the client (apart from the HTML). If you have used AJAX , the this code should be strikingly similar. However AJAX and WebSocket are very different technologies, I will discuss that in last section. But the good part with WebSocket is, that there is nothing new to code at the client side. In fact you can very easily port all your AJAX applications to WebSocket. The real difference is at the server side and that is where things start getting a bit complicated.
Writing a WebSocket Server
As I have said earlier, the server is the place were things get complicated. This has nothing to do with the WebSocket protocol, but with mindset of web developers(like me) who generally don’t have too much exposure to sockets programming. Till now life in web development was made easier by HTTP servers and various frameworks. Since WebSocket is emerging technology there are not many tools available to make life easy. So we have to create our own server and code to handle clients (for now at least). The server which I have written for this article is very basic one. It by no means contains comprehensive implementation of WebSocket protocol. My code is monolithic and might have very limited reuse potential. It is basically a TCP server with some additional code to handle WebSocket protocol. It is multithreaded and capable of handling multiple clients. Since the code is pretty complicated, I will only discuss the important points in this article.
Accepting Client connections and Handshaking
Handshaking is the initial exchange of information that happens between server and the client. It basically is a check at each end, to ensure both the parties understands the protocol that is been requested. The server contains an instance of “TCPListener” which listens to incoming TCP request at specified URL and port. I have created a new class called “WebSockClientManager”, which is responsible of accepting a new client connection via the listener and managing the connection. Once a connection is established, I create a new instance of “WebSockClient”, which is another class written by me ; and add it to the instance of “WebSockClientManager”. The idea is, there will be only one instance of “WebSockClientManager” which will manage all clients. Given below is code to initialize a “WebSockClientManager”.
TcpListener t = new TcpListener(IPAddress.Loopback, _port); |
When “AddClient” method of the “WebSockClientManager” is called, (apart from other things) it creates a new thread to manage this connection, assigning the thread’s id to “ManagingThreadId” property of “WebSockClient” . The following code does this:
if (_clientList.Count < _maxConnection) |
The “HandleClient” method of “WebSockClientManager” is responsible for performing proper handshake and handling requests from client. The client sends a handshake message to which the server responds with something like this:
//Send Sever Handshake to client. |
For more information on Handshaking in WebSocket please refer to following document:http://tools.ietf.org/html/draft-hixie-thewebsocketprotocol-54 . If after transmission of the above text, the client did not drop the connection, it means that the WebSocket connection was successfully established. Once connection is successfully established, we can start sending or receiving data. The “HandleClient” method does two things: performs handshake and if it is done (and everything is OK) reads/transmits data to client.
Reading and writing data to Clients
Now, to write data to all the clients, we simply call the “WriteData” method of “WebSockClientManager”. In this example since we have created instance of a Windows log and have attached handler to “EntryWritten” event. So every time a new entry is made to the log this handler is called which in turns calls “WriteData” and passes information about the new entry:
... |
Inside the “WebSockClientManager.HandleClient” method we listen to data which client is sending. If the client sent “STP” or “STR”, we accordingly change the status of the client, so that it is subscribed/unsubscribed from server.
// Read data from client. Do whatever is required. |
Addressing Multiple Clients
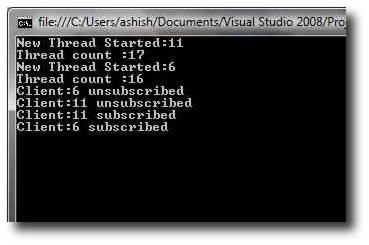
If you notice the code so far I have used separate threads to handle individual clients. In this case, we will have to terminate threads once a client disconnects or an exception occurs. I have also added a upper limit to number of connections that can be handled by server. If this limit is exceeded, the server simply refuses connection. One problem which I have not been able to solve is detecting disconnected clients. The only place I was able to detect that a client has disconnected, is after trying to send some data to it. If that fails I simply remove the client from the list, so that we free up space for new clients. This is one area where I want to work more with my code, but for the sample application I didn’t bother much. The code to free up closed connection from queue is given below:
public void AddClient(WebSockClient c) |
Configuring the client and server
To run this example, you will have to configure the server and then the client. The server can be configured by modifying its config file. The following entries must be changed:
- The “PORT” is the port on which you want your server to listen to requests from client. The value for “WEBSOCKETORIGIN” basically specifies domain/address of webpage which will access the WebSocket server. This is part of security feature of WebSocket which is used to enforce same domain access policy by client browser. It tells the browser that it is alright to allow client page downloaded from “WEBSOCKETORIGIN” to access server at “WEBSOCKETLOCATION”. More details on this can be found here: http://tools.ietf.org/html/draft-hixie-thewebsocketprotocol-54
 <add key="PORT" value="8181"/>
<add key="WEBSOCKETORIGIN" value="http://localhost:49630"/>
<add key="WEBSOCKETLOCATION" value="ws://localhost:8181/demo"/>
- Also you may want to change values for “MAXCONNECTIONCOUNT” and “LOGTOMONITOR”. The first one specifies the maximum number of parallel connections the server should handle , while the later specifies the name of the Windows event log which the server should be monitoring. In the example I am monitoring the “Application” event log, you may want to change it to a different log if you don’t have permissions to this log. In that case you can write a sample windows service/application to write some test entries to your log on some event (just for testing).
<add key="MAXCONNECTIONCOUNT" value="3"/>
<add key="LOGTOMONITOR" value="Application"/>
- Once the server is configured, make sure that you change the server address in clients javascript.(In the call to ws = new WebSocket(“ws://localhost:8181/demo “);
Testing the application
After going through all this let me tell you how to run the application.
- First, start the server.
- Once the server is up, access your webpage (client) using a web browser which supports WebSocket. DO NOT run the webpage locally, it MUST be hosted on a HTTP server.
- Once the page has loaded, press the “Try to Connect” button. You will receive “Hello Client” from the server.
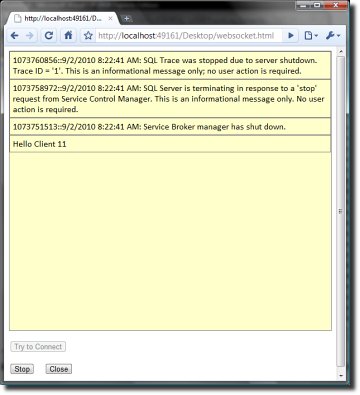
- Now perform some actions that writes to your event log. I generally go to “services” and start/stop Sql Server service to generate events. You can view these events on the clients UI.
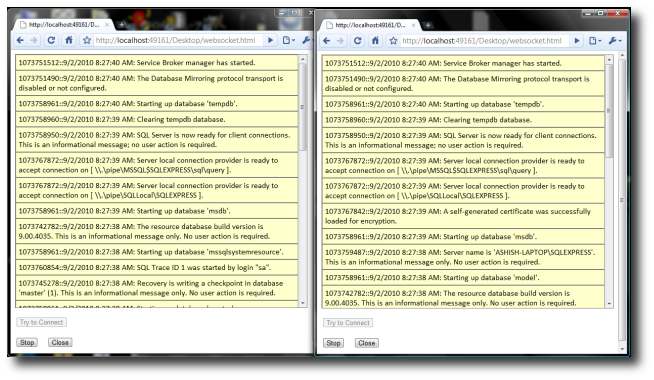
- You can choose to Stop/Start subscribing to the server and it should work. Also try starting multiple client instances.
What’s the future
In my personal opinion, WebSocket is going to be next big thing in web development. Its going to take time to mature. Once big players start creating development tools and frameworks for writing client and servers, WebSocket is definitely going to take-off. With things like HTML5 and WebSocket, the browser is, in my opinion, going to replace most applications you use. Hope this article was useful to you. Please share your feedback and criticism via comments. Also you may want to take part in the poll which I created on WebSocket, to share your opinion on this technology.


